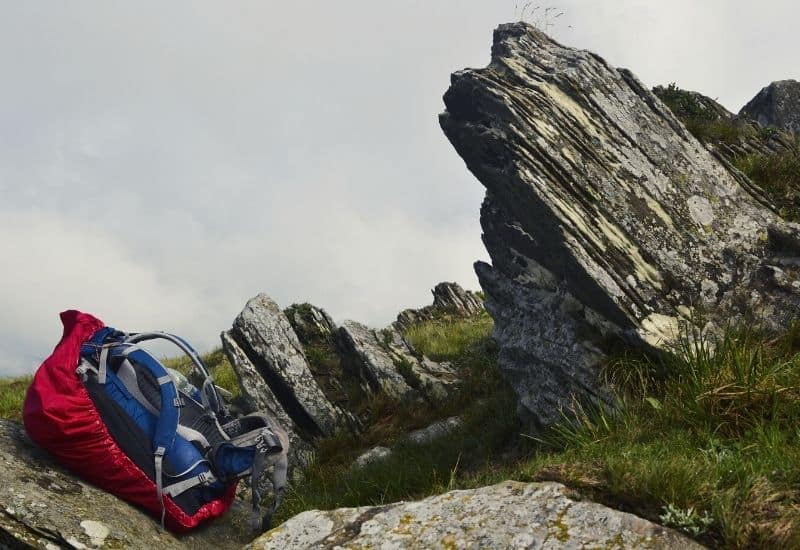
Taking to the trails with an ill-fitting, heavy, or fragile backpack can lead to a memorable day on the trail for all the wrong reasons. Bruised or raw shoulders, tears, broken zippers and rain water leaking through are all potential issues with an inferior pack.
With a saturated market filled with products claiming superior features and quality, the task of separating genuine quality from marketing exaggerations can be daunting.
Our experienced team of reviewers give their opinions on some of the top daypacks on the market, why we think the Osprey Talon (Tempest) is the best overall hiking daypack, and explain which features you should consider when deciding which is the right bag for your needs.
Do
Don’t

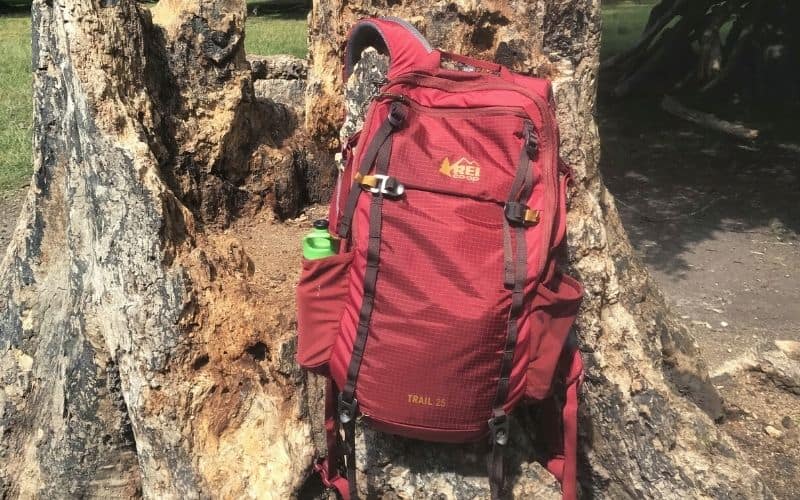
Table of Contents
The Best Small Hiking Backpack: Quick Recommendations
-
Editors Choice:
Osprey Talon (Tempest)
“Combining a well-thought-out design with next-level comfort, this pack leaves the best of the rest languishing in the shade.” -
Best Value:
REI Co-op Trail (Women’s Trail)
“Weighing 2 lbs., this 25-liter pack will be a little on the heavy side for some, but it makes up for those added ounces with an affordable price tag and comfort levels on a par with some of its far pricier competitors.” -
Best Budget:
REI Co-op Flash
“A comfortable, ultralight pack with a decent feature set given its price and lack of poundage. Ideal for shorter day hikes.” -
Best Lightweight Pack:
Deuter Speed Lite
“It may way in at just over a pound, but this smartly designed little pack makes very few compromises in terms of comfort compared to much heavier and pricier packs.” -
Best Hydration Daypack:
Gregory Citro H20 (Juno H20)
“Boasting an excellent array of storage options and offering comfort in spades, this pack very nearly pipped the Talon to the title of our Best Daypack Overall.” -
Most Comfortable Daypack for Heavy Loads:
Osprey Stratos (Sirrus)
“If you’re the type of hiker who lives to fill every last inch of space inside their pack, the Stratos’ extra support and padding make it a better option than other, similar-sized packs.” -
Best Waterproof Pack:
Hyperlite Mountain Gear Daybreak
“It may be pricey, but the Daybreak’s extra-robust, water-resistant materials, and intelligent storage features make it worth the added outlay for wet-weather hiking.” -
Best Larger Volume Pack:
REI Co-op Traverse
“This 32-liter pack is one of the top-performers comfort- and storage-wise, and is large enough for gear-intensive day hikes, hut-to-hiking, or overnight trips.” -
Best for Side Hikes:
Sea to Summit Ultra-Sil Nano
“Weighing just 1 oz., this frill-free little hiking day pack is the lightest in our review. While short on padding, features, and support, it’s the ideal carrying solution for short day hikes from a basecamp.” -
Recommended:
Osprey Daylite Plus
“Though a little short on storage points and support, this 20-liter pack has a DWR coating, a lightly padded back panel and shoulder straps, weighs a very manageable 1 lbs. 5 oz., and is available at a very reasonable price.”
Which is the best day hiking backpack?
After testing dozens of packs over the years in the Scottish highlands, the Alps, and sections of the Appalachian Trail our team has shortlisted the following as our top picks.
- Osprey Talon 22 (Tempest 20)
- REI Co-op Flash 22
- Osprey Daylite Plus
- Hyperlite Mountain Gear Daybreak
- Osprey Stratos 24 (Sirrus 24)
- REI Co-op Trail 25 (Women’s Trail 25)
- Deuter Speed Lite 20
- Sea to Summit Ultra-Sil
- Gregory Citro 24 H20 (Juno 24 H20)
- REI Co-op Traverse 35

Osprey Talon 22 (Tempest 20)
Editors ChoiceOur award for best hiking daypack overall goes to the Osprey Talon on account of its outstanding comfort, excellent features, and availability in various torso sizes.
The Osprey Talon (Osprey Tempest for women) is the most comfortable hiking daypack we’ve ever had the pleasure of pulling on our backs. It has cushy padded shoulder straps and back panels, wide, padded hip belts, and a PE frame that provides all the support you need when lugging a heavier load. In testing, it was a true standout when loaded with 5-12 lbs of gear.
Featuring multiple exterior pockets, a hydration bladder pocket, and attachment points for trekking poles, the Talon/Tempest also beats all other packs in terms of its organization.
Specs
- Volume: 11-22-26-33-36-44-55L
- Sizing: Men’s – S/M (17-20”) – L/XL (19-22”), Women’s – XS/S (13-16”) – S/M (17-20”)
- Hydration Reservoir: Compatible
- Compartments: Main + 6 Pockets
- Weight: 1 lb 14.6 oz
PROs
- Hugely comfortable
- Great array of pockets
- Good ventilation
- Multiple sizes
CONs
- Bells & whistles add a bit of weight
- Rain cover is a separate purchase
Bottom-Line: For overall comfort, organization, and sizing, the Osprey Talon/Tempest is the best day pack for hiking we’ve ever come across.
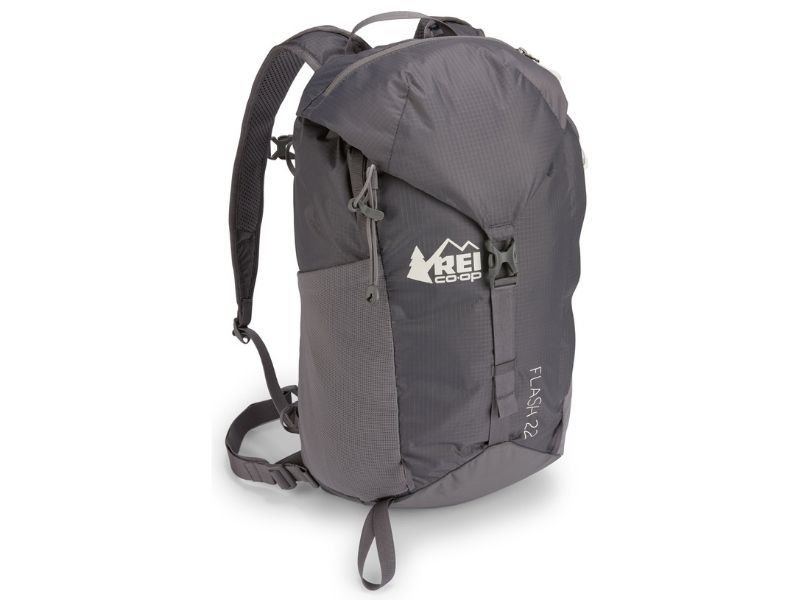
REI Co-op Flash 22
Best BudgetThe REI Co-Op Flash is the perfect daypack for hikers looking for a reasonably comfortable bag that’s capable of hauling moderately heavy loads without breaking either your back or the bank.
This ultralight pack is available in several sizes (18L-55L), but we found that the 22L version offered more than enough space for even longer day hikes.
The Flash 22 weighs only 13 ounces, making it the second lightest pack in our review after the Sea to Summit Ultra-Sil Nano (1 oz.). However, compared to the Ultra-Sil Nano the Flash 22 is a far more comfortable carry, especially with heavyish loads.
This pack lacks the beefy back panel and padded hip belt featured on the Osprey Talon 22 or REI Co-Op Traverse. However, the soft foam cushioning in the rear and mesh straps are sufficient to haul a 15-pound load on shorter day hikes without feeling the pinch in your shoulders or the rub on your back.
This pack also has a decent feature set for such a light daypack backpack. It has an internal hydration sleeve, a duo of tool loops, stash side pockets, a removable hipbelt, and side compression straps that can also be used to lash gear to the pack’s exterior.
Specs
- Volume: 18-22-45-55L
- Sizing: unisex (16-20”)
- Hydration Reservoir: Compatible
- Compartments: Main + side mesh pockets
- Weight: 13 ounces (22L)
PROs
- Affordable hiking daypack
- Ultralight
- Compact
CONs
- Doesn’t offer a lot of support or comfort
- Fewer organizational features
- One size pack
Bottom-Line: If you’re looking for minimalist packs for short hikes, this budget daypack is a great option.

Gregory Citro 24 H20 (Juno 24 H20)
Best Hydration DaypackThe Gregory Citro 24 (Juno for the ladies) is a great choice of daypack for hikers who like to do their hydration on the go.
This incredibly well-designed pack is a true ticker of boxes. In addition to its hydration-compatible design, it’s one of the most comfortable packs in our review, second only to the Osprey Stratos 24 for comfort.
The Citro and Juno have an alloy steel frame that provides additional load support without adding noticeably to the pack’s weight – ideal for longer hikes with heftier loads. It also uses a VaporSpan ventilated suspension system and moisture-wicking mesh straps to help keep you dry when temps are high.
Storage-wise, this pack has a lot going on… In addition to the roomy main compartment, there’s a 3L zippered hydration sleeve with a hanger, a total of 5 pockets, hip packers, a hood pocket, tool attachment loops, and even sunglass straps. All of this makes it second only to the REI Co-Op Traverse for organization, though the Citro/Juno weighs a whole 9 oz less.
Specs
- Volume: 24-30-36L
- Sizing: Men’s (16-21”), Women’s (14-19”)
- Hydration Reservoir: Comes with hydration bladder
- Compartments: Main + 5 pockets
- Weight: 2 lbs
PROs
- Super comfortable and supportive
- Great pocket organization
- Includes hydration pack
CONs
- Heavier backpack
- One size fits all
Bottom-Line: The Gregory Citro/Juno goes toe to toe with the Osprey Talon and narrowly loses, but it may be the cheaper option if you need to purchase a hydration bladder too.
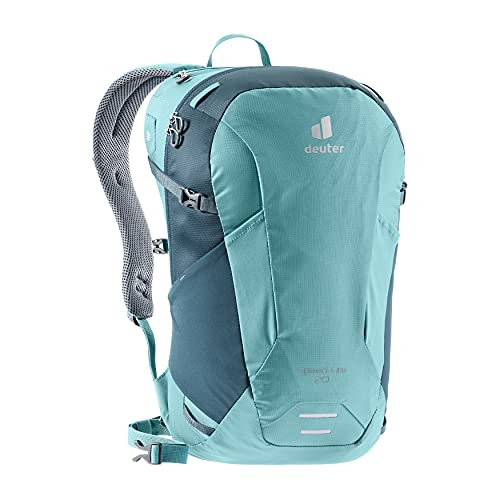
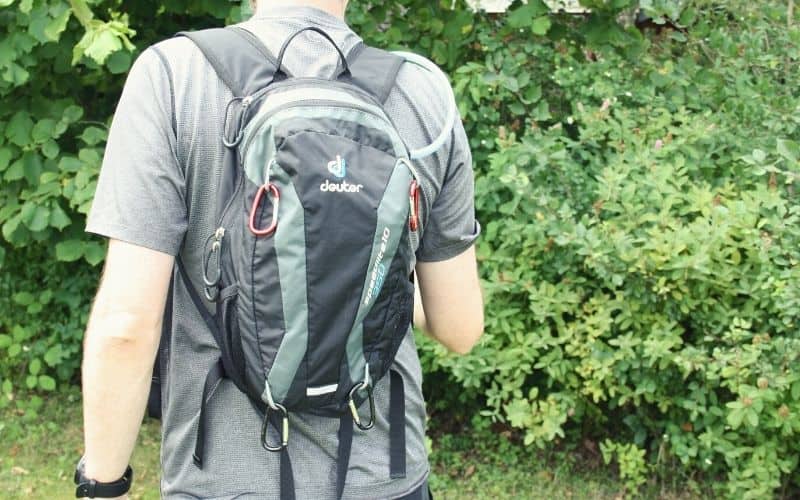
Deuter Speed Lite 20
Best Lightweight DaypackThe Deuter Speed Lite 20L earned our testers’ vote as the best lightweight day pack out there due to its combination of a featherlight weight with user-friendly features and components.
Most lightweight backpacks make a few compromises to cut down on heft. Not so the Deuter Speed Lite 20.
This affordable daypack weighs a tiny 1 lbs. 1 oz. and yet offers outstanding comfort levels – even with moderately heavy loads and on long days on the trail. These comfort levels come courtesy of plush V-shaped cushioning in the back panel and the padded, ergonomically shaped adjustable shoulder straps, both of which use breathable mesh to help keep things cool and sweat-free.
It also has a total of 4 pockets, a hydration well, and a large central compartment that can accommodate a few extra layers, waterproofs, eats, drinks, and other essentials.
While there are better options out there for carrying a heavier load or for longer hikes, like the Osprey Stratos or Talon, our testers found this one perfect for day hikes when you’re keen to travel fast and light.
The only downsides we found with this pack are the lack of padding on the waist belt and the inability to adjust torso length. Other than that, it’s a high scorer across the board.
Specs
- Volume: 12-16-20-24-26-32L
- Sizing: Men’s + Women’s
- Hydration Reservoir: Compatible
- Compartments: Main + 4 pockets
- Weight: 1 lb 1 oz
PROs
- Lightweight
- Great Price
- Comfortable pack for lighter loads
CONs
- One size
- The front stretch pocket isn’t very functional
Bottom-Line: With its barely-there 17 oz weight and great price, the Speed Lite 20 is a great lightweight choice for short quick hikes or trips around town.
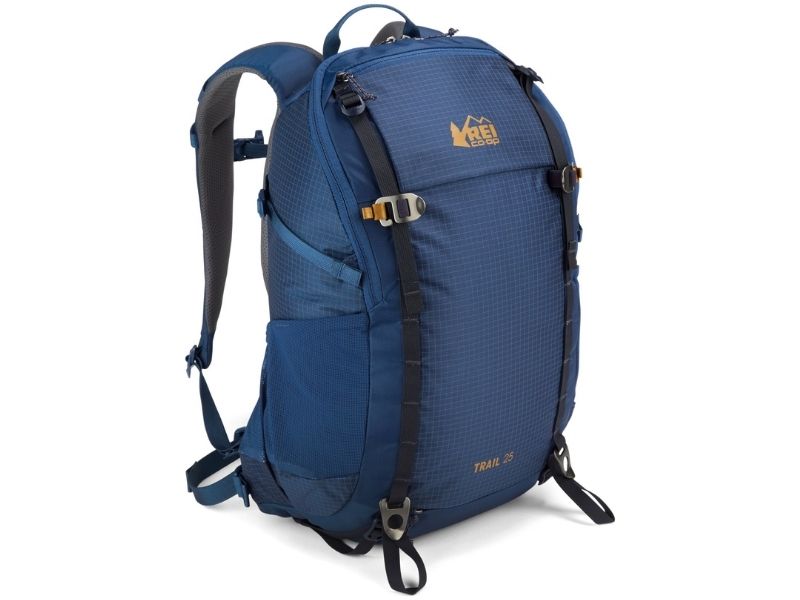
REI Co-op Trail 25 (Women’s Trail 25)
Best ValueThe REI Trail 25 is a great backpack for buyers looking for high quality without a high price tag. Since first hitting the market, this highly popular pack has earned plaudits galore from hikers everywhere, and it’s not hard to see why.
Although at the heavier end of the scale, the Trail 25 offers a lot that makes carrying an extra few ounces well worth it. It is hydration compatible, has ample storage options, boasts an HPDE internal frame for load support, and would have ranked in the top three most comfortable packs in our review if REI had only included a little padding in the hip belt.
The Trail has some of the beefiest back panel and shoulder strap padding in our review. This makes it a good pick for buyers who aren’t huge fans of the mesh-only shoulder straps and minimalist padding used in packs like the Sea to Summit Ultra-Sil Nano or the Osprey Daylite, or who don’t want to splurge on pricey options like the Gregory Citro or REI Co-Op Traverse.
While its 2-pound weight will likely put off the gram-counters, we believe the Trail 25’s a great option if you’re more concerned with overall performance and functionality.
Specs
- Volume: 25-40L
- Sizing: Men’s (17-19”), Women’s (17-19”)
- Hydration Reservoir: Compatible
- Compartments: Main + 5 pockets
- Weight: 2 lbs
PROs
- Affordable
- Great organization
- Durable
CONs
- Heavy
- No padding on hip belt
- Doesn’t vent well
Bottom-Line: The REI Trail 25 does a good job marrying functionality with a great price to produce a great value pick.
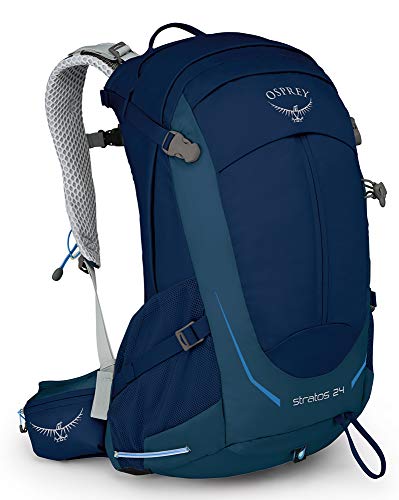
Osprey Stratos 24 (Sirrus 24)
Most Comfortable Daypack for Heavy LoadsThe Osprey Stratos 24 wins our vote for the best daypack for heavy loads due to its effective suspension system and emphasis on wearer comfort.
One of the main drawbacks of almost any daypack is the inability to provide the comfort of a regular backpacking backpack when filled with a heavy load. With the Osprey Stratos and Sirrus, this is categorically not the case.
Weighing 2 lb. 12 oz., this is the heaviest pack in our review. However, there are a few good reasons why the Stratos/Sirrus has been one of Osprey’s top-selling packs for the best part of a decade.
The pack’s most notable selling point is comfort. More than any other daypack we tested, the Stratos/Sirrus makes light work of carrying heavy loads. It uses cushy padding on the shoulders, back panel, and hip belt, a LightWire internal frame for support, has adjustable torso length and uses an AirSpeed mesh suspension system for added airflow around the back.
We also love the Stratos/Sirrus’ organizational features, which include five pockets, a hydration reservoir, hip belt pockets, and a pair of external gear loops. There’s also an integrated rain cover and dual-zippered access to the main compartment, which makes it easier to load/unload than any other pack in our review.
While the Osprey Talon 22’s lighter weight, comfort, and impressive feature set won it our vote as top daypack for hiking, this one’s our go-to when hauling a little more heft.
Specs
- Volume: 24 – 26 – 34 – 36 -50L
- Sizing: Men’s (18-22”), Women’s (15-18”)
- Hydration Reservoir: Compatible
- Compartments: Main + 5 pockets
- Weight: 2 lbs 12 oz
PROs
- Great support even with heavy loads
- Best ventilation system in our review
- Super comfortable
- Included rain cover
CONs
- Heavy & Bulky
- Compression straps are oddly placed over side water bottle pockets
Bottom-Line: The Stratos/Sirrus offers the best support and ventilation system of any packs we’ve come across giving it a higher than normal load-carrying capability.
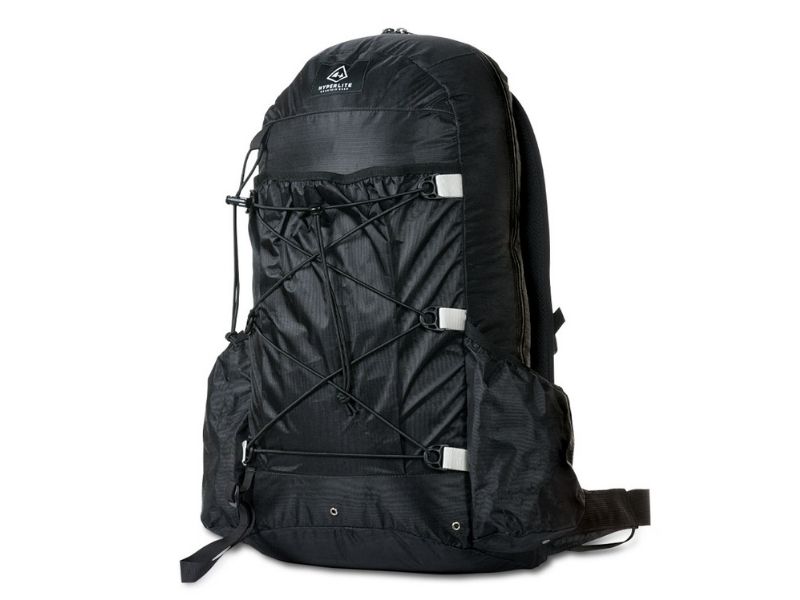
Hyperlite Mountain Gear Daybreak
Best Waterproof PackThe Hyperlite Mountain Gear Daybreak’s is a great daypack for wet-weather adventures – it’s made with waterproof materials, boasts a roll-top closure to prevent rain sneaking in, and scores highly in most other metrics, too.
This waterproof pack makes a few compromises, granted. At just 17L, it’s the smallest pack in our review. There’s also no hydration reservoir and it’s the most expensive pack on our list by a large margin.
Despite these imperfections, there’s also a lot to love.
For starters, this is one of the most rugged and durable packs in our review, using robust, hard-wearing materials that are more likely to survive extreme rough treatment on the trail than any other models featured in this guide.
Those materials are also highly water-resistant, meaning you can carry on hiking in wet weather without having to worry about the pack’s contents or stopping to throw on a rain cover.
Comfort- and convenience-wise, the Daybreak is up there with the top performers we tested, the Osprey Talon, Gregory Citro, and Osprey Stratos. It has plenty of chunky cushioning in the back panel, straps, and hip belt, plenty of interior storage options, a padded laptop sleeve, and uses a clamshell design that provides easy access to all your pack’s contents.
Specs
- Volume: 17L
- Sizing: S (15-17”) – M (17-19”) – L (19-21”)
- Hydration Reservoir: Not compatible
- Compartments: Main compartment + 3
- Weight: 1 lb 4 oz
PROs
- DCF materials offer great waterproofing
- Ultralight daypack
- Durable and well built
CONs
- Expensive
- Lacks hydration sleeve
- Small main compartment
Bottom-Line: If you want a low-weight daypack that handles inclement weather, then the Daybreak fits the bill.

Osprey Daylite Plus
RecommendedThe Osprey Daylite Plus is a simple, cheap, lightweight daypack that’s ideal for hikers who don’t need anything too fancy or rugged.
The Daylite weighs in at 1 lb. 5 oz., placing it in the middle of the pack in regards to weight. It is, however, far cheaper than similarly sized packs like the Osprey Talon and Gregory Citro, and a little more comfortable for day-long use than featherweights like the REI Co-Op Flash 22 or Sea to Summit Ultra-Sil Nano.
The comfort upgrade of the Daylite as compared to other lightweight packs is owed to the use of highly breathable, mesh-covered AirScape foam and an EVA foam harness. While not as cushy as the padding on the Talon, Stratos, or REI Traverse, we found that these features make the Daylite a highly comfortable carry whenever you’re hauling under 12 lbs. of gear.
This pack also has a fairly impressive set of features boasting a total of five pockets, a hydration reservoir, a water-repellent DWR coating, a removable hip belt, and a panel-loading main compartment.
Specs
- Volume: 20L
- Sizing: Unisex
- Hydration Reservoir: Compatible
- Compartments: Main compartment + 5 pockets
- Weight: 1 lb 5 oz
PROs
- Lightweight
- Price
- Lots of pockets/compartments
CONs
- Not very supportive
- Lacks attachment points
Bottom-Line: A simple, cheap, and lightweight pack, the Osprey Daylite is a great option for short day hikes.

Sea to Summit Ultra-Sil
Best for Side HikesUltra Sil Nano is the lightest daypack we tested (1 oz.)and, according to our testers, the ideal side-trip pack for longer backpacking or camping adventures.
The Nano is made with 15D siliconized nylon fabric that maximizes strength while minimizing weight. The manufacturers claim that this allows the pack to carry up to a 20kg load, but the lack of padding in the back or shoulders means we’d only recommend this one for carrying soft, light loads on shorter day hikes or side trips when basecamping.
This pack doesn’t boast the same kind of feature set, support, cushioning, durability, or compartmentalization as other packs in our review – or any feature set at all, for that matter. All you get is a simple, surprisingly sturdy little pack that scrunches down to a tiny little bundle and weighs less than your average glove.
Specs
- Volume: 18L
- Sizing: Unisex
- Hydration Reservoir: Not compatible
- Compartments: Main compartment only
- Weight: 1 oz
PROs
- Super lightweight
- Tiny packed size
- Very affordable
- Comfy enough with lighter loads
CONs
- Not very durable
- Little comfort & no support
- Main compartment only
- No chest strap
Bottom-Line: Its light weight and tiny packed size make the Nano a great choice for side-hikes on longer backpacking trips where you don’t want to haul your main backpacking pack.
REI Co-op Traverse 35
Best Larger Volume PackThe REI Traverse is the perfect daypack for hikers looking for a pack that bridges the gap between backpacks for shorter trips and backpacks for overnight trips. With a 32-liter capacity, it’s the biggest and most versatile pack we tested.
Weighing 2. lbs 9 oz., this is the second heaviest pack on our list after the Osprey Stratos. Like the Stratos, it has an internal frame, plenty of padding on the shoulders, hip belt, and back panel, as well as a built-in rain cover and multiple interior compartments.
While the Stratos’ adjustable frame might make it a more appealing option to some, our testers felt they’d plump for the Traverse for the extra 11 liters of storage space it offers. Otherwise, there’s not a lot to separate the two.
The Traverse also has a handful of winning features that set it apart from the best of the rest. We particularly like the reassuringly tough ripstop fabric, the frontal kangaroo stash pocket, oversize zippered pockets on the hip belt, its outstanding lumbar support, and the way the water bottle sleeves are tilted forward to provide easy access when you’re on the move.
Specs
- Volume: 32 – 60 L
- Sizing: Men’s – S (18”) M (19”) L (20”), Women’s XS (16”) S (17”) M (18”)
- Hydration Reservoir: Compatible
- Compartments: Main + 6 pockets
- Weight: 2 lbs 9 oz
PROs
- Comfortable
- Great support
- Great organization
- Adjustable shoulder straps and sternum strap
CONs
- Frame isn’t adjustable
- Large for most day hikes
Bottom-Line: If you need a little more volume for short overnight or gear-intensive hikes then you can’t beat the price that the Traverse offers.
Hiking Daypack Comparison Table
| Product Name | Volume | Hydration Compatible | Weight |
|---|---|---|---|
| Osprey Talon 22 (Tempest 20) | 11-55L | Yes | 1 lb 14.6 oz |
| REI Co-Op Flash 22 | 18-55L | Yes | 13 ounces |
| Gregory Citro 24 H20 | 24-36L | Yes | 2 lbs |
| Deuter Speed Lite 20 | 12-32L | Yes | 1 lb 1 oz |
| REI Co-Op Trail 25 | 25-40L | Yes | 2 lbs |
| Osprey Stratos 24 | 24-50L | Yes | 2 lbs 12 oz |
| Hyperlite Mountain Gear Daybreak | 17L | No | 1 lb 4 oz |
| Osprey Daylite Plus | 20L | Yes | 1 lb 5 oz |
| Sea To Summit Ultra-Sil | 18L | No | 1 oz |
| REI Co-Op Traverse 35 | 32-60L | Yes | 2 lbs 9 oz |
At a Glance: Categories
Comfort: Osprey Talon (Tempest), Gregory Citro H20 (Juno H20) and Osprey Stratos (Sirrus)
Fit and Sizing: Osprey Talon (Tempest), REI Co-op Trail (Women’s Trail), and Osprey Stratos (Sirrus)
Frame Styles: Gregory Citro H20 (Juno H20) and Osprey Talon (Tempest)
Pockets & Organization: REI Co-op Traverse, Hyperlite Mountain Gear Daybreak and Osprey Talon (Tempest)
Ventilation: Osprey Talon (Tempest) and Gregory Citro H20 (Juno H20)
Water Resistance: Hyperlite Mountain Gear Daybreak and REI Co-op Traverse
What is a daypack?
A daypack is a backpack designed to carry all the gear a hiker might need for a single day on the trail. In most cases, this means packs with capacities ranging from 7 or 8 liters up to around 25 liters.
How to choose a hiking bag?
When choosing a pack to meet your needs you should consider the following.
- Pack Volume
- Comfort
- Fit and Sizing
- Frame Styles
- Pockets & Organization
- Ventilation
- Water Resistance
- Weight
- Hydration Compatibility
Pack Volume
Pack volume should be your starting point whenever choosing a new backpack.
The capacity of a daypack is measured in liters, and you’ll find packs as small as 5L up to around 40L – there are packs bigger than this, but they’re overkill for a day hike.
A smaller backpack will be sufficient if you only need to fit a few things, like clothes or food, although most of us need a little more space to carry other items like the 10 essentials. Packs of around 20-30L are the most popular amongst day-hikers.
The capacities of the packs we tested ranged from 17 liters (Hyperlite Mountain Gear Daybreak) to 32 liters (REI Co-Op Traverse). All of the packs, except for the Sea to Summit Ultra-Sil Nano and Osprey Daylite Plus, are available in multiple sizes.
The larger packs we’ve reviewed are perfect for short, ultralight backpacking trips or cold-weather adventures. For casual day hikes or if you require less gear, then a bag around 25 liters is your best option and will see you through a variety of outdoor adventures.
The smaller packs have fewer pockets and may not be as organized as their bigger counterparts, but are lighter and more compressible for storage.
Below are some basic guidelines around planned use and capacity:
- Under 10 liters: These are lightweight packs that can fit only a few bare essentials like your rain jacket, keys, and some snacks. Their slim profile and small capacity make them best suited to trail-running or very short hikes.
- 10-20 liters: These compact packs have a little more storage room and organization, allowing you to pack extra food, gear, and clothes. They’re suitable for traveling or short-day hikes
- 20-30 liters: The sweet spot for day-hike backpacks. This should be sufficient room to fit your 10 essentials and a few extras like a camera or stove.
- 30-50 liters: If you’re heading hiking in the winter, or are heading out mountaineering or climbing, then a larger pack is ideal for the extra clothing and gear you’ll need. These larger packs are also great for ultralight backpacking trips or parents who need to carry their kids’ gear.
Comfort
Comfort is one of the top priorities when choosing a daypack. A well-fitted daypack should distribute most of the pack’s weight at two contact points – your shoulders and your hips.

When looking at the shoulder straps, two things are important – the level of padding they provide and their shape.
The level of padding is a pretty straightforward check based on the material used and the thickness. Packs that use simple webbing such as the Sea to Summit Ultra-Sil Nano are much less comfortable than packs like the Osprey Stratos that have heavily padded straps.
The shape of the straps can also play a role in overall comfort. Many cheaper day backpacks and travel daypacks use straight shoulder straps, while more expensive packs such as the Deuter Lite or the Osprey Talon will use S-shaped straps that are a better anatomical fit for your torso.
Hip belts are intended to distribute some of the weight from your backpack onto your hips, relieving some of the pressure on your shoulders. While the majority of hiking daypacks have hip belts, their ability to relieve shoulder strain varies greatly.
For short day hikes or trips where you intend to haul no more than 10 pounds of gear, then a lightweight, small hiking backpack with a thin webbing hip belt such as the Deuter Speed Lite or REI Co-Op Flash should suffice. However, once you get into longer treks with extra gear we recommend investing in a pack with a padded hip belt such as the REI Co-Op Traverse or the REI Co-Op Talon.
Some models such as the Deuter Speed Lite allow you to remove the hip belt, which can be useful if you intend your pack to pull double-duty for use around town as well.
Most packs have a sternum strap that allows you to connect your shoulder straps. This provides a more snug fit and extra stability on those uneven hikes by preventing the weight in your pack from shifting unexpectedly. The best chest straps are made with elasticity so they don’t dig into your chest while you’re moving.
Fit And Sizing
Fit and sizing is a crucial consideration when choosing a daypack – get it wrong and you’re in for a world of discomfort.
The pack should be the correct size for the length of your torso, and it must tighten around your shoulders and hips correctly in order to carry weight comfortably.
Some packs such as the Osprey Talon or the REI Co-Op Traverse are available in multiple lengths, making it easier to find a better fit for your body.
Before buying, ask someone to help measure the length of your torso by placing a measuring tape starting at your C7 vertebrae (base of your neck) down your spine to a point that is in line with the Iliac Crest (the bony bit at the top of your hips). Compare this measurement against the manufacturer’s sizing chart and select the most suitable option.
To double-check you have the right size, put the bag on and position the hip belt one finger above the top of your hips, and check where the shoulder straps are sitting. If there is a gap then it means that pack is too big for you; if the point where the straps connect to the bag’s body is more than a couple of inches down your back, it’s too small.
Many bags such as the REI Co-Op Flash, Deuter Speed Lite, and Gregory Citro come in a single size. If you’ve got your eye on one of these “one-size-fits-all” bags, then it’s still a good idea to know your torso length as manufacturers typically give length ranges for these packs.
Knowing your torso length can help you decide between two packs or stop you from selecting a pack that will be unsuited to your physique.
A female’s anatomical structure is different from a man’s, so it only makes sense that packs designed for women are made with the shape of the female form in mind. Women’s-specific versions are made with different measurements to accommodate for a shorter frame, smaller waist, narrower shoulders, and curvier hips than males.
For simple casual use, a unisex pack is fine but for longer day hikes a women’s model like the Osprey Tempest (Talon) or REI Co-Op Trail makes for a more comfortable adventure.
Frame Styles
When choosing your next daypack, the frame style is a factor that shouldn’t be overlooked.
Larger capacity packs will have a metal or plastic internal frame. The design of the frame is crucial because it keeps the pack’s shape when filled. It does this by creating a semi-rigid structure to prevent sagging, which makes for more comfortable carrying and easier packing. Common designs are U-shaped, hoops, or sheet frames.
The majority of daypacks have a semi-rigid frame sheet giving the bag shape, as well as a layer of foam or mesh on the back panel.
Lower-capacity frameless packs may have a simple padded back panel. This can achieve a similar effect to a frame assuming you are carrying less than 10-15 lbs in weight.
Some ultralight packs, such as the Sea to Summit Nano, may dispense with the padded back panel completely. While this makes the pack lighter and more compressible, it also means you have to pack carefully to avoid your gear poking into your back.
Pockets and Organization
The pockets, compartments, and organizational features in a daypack are well worth considering when choosing.
Depending on the amount of gear you’re taking and your personal preferences, having a variety of interior and external pockets and compartments can be useful for both easy access and storing items.
Different packs offer a variety of organizational features. These range from the ultrabasic – see the Sea to Summit Nano, which only has a single main compartment – to the Osprey Talon, which has hip belt pockets, internal pockets, external stretch mesh pockets, hydration sleeve, and attachments for trekking poles and ice axes.

- Hip Belt Pocket: Packs with padded hip belts will often have a zippered pocket here which is great for storing small items you’ll want at hand such as snacks or your phone.
- Top Panel Pocket: Zippered pocket great for storing important items like your keys and wallet or slightly larger handy items like headlamps or a first aid kit.
- Large Stretch Mesh Pocket: Located on the front of the main compartment this is a great place to stuff wet rain jackets or pants rather than dumping them back in your back. They’re also known as “shove-it” pockets.
- Side Water Bottle Pockets: Located on the side of the pack, these external stash pockets are there to give you easy access to your water bottles.
- Gear Loops: Extra loops, trekking pole holders and daisy chains are great for attaching extra gear like climbing helmets or trekking poles to the outside of your pack.
- Compression Straps: While not actually extra pockets, compression straps help compress your pack, removing excess space and preventing your gear from shifting while you hike.
Most hiking daypacks are top-loading, meaning you access your gear through an opening at the top of your bag. There are three types of closure systems for this type of pack: roll-top lids, zippers, and drawcords. Each has its advantages and drawbacks.
Roll-tops roll or fold down over a stiff material in the neck of the opening, and clip or hook tight. The main benefit of rolltops is the ability to compress your bag down to the exact volume of gear that the interior compartment contains.
Due to the lack of opening or zipper on a rolltop, there are fewer weak points for rain to leak in. This also makes it the most secure closure mechanism and unlikely to open itself. The downside is you need to roll/unroll the closure each time you want in your pack, which is not as quick or easy as using a zippered or drawcord system.
Drawcords such as those used on the REI Co-Op Flash are simple, easy to use, and the most lightweight. However, there will always be a gap at the opening no matter how tight you cinch it closed, meaning it’s more likely to leak through than zippers or rolltops. Depending on the quality of the drawcord they will, to varying degrees, slowly untighten themselves while you walk.
Zippers are the most common closure mechanism and they sit in the middle ground between roll-tops and drawcords, striking a good balance between ease of use and security/waterproofness.
Some packs, such as the Deuter Speed Lite, Osprey Talon, and Hyperlite Daybreak, are referred to as panel-loaders. In these packs, the zippers extend further down, allowing the entire front compartment to be zipped open for quick access to the top or bottom (or middle) of your pack. These packs are heavier but useful when you’re on a more gear-intensive trip and don’t want to rummage around or unpack your bag to find the item you need.
Ventilation
No matter what season you do most of your hiking in, ventilation is a key consideration when choosing a new daypack.
Some packs do a better job than others at boosting airflow and reducing back sweat.
Almost all the packs we tested have some form of a ventilated back panel and shoulder straps (usually with mesh padding), which will help a little bit. To really reduce back dampness, though, you need to reduce the contact area between the bag and your back.
This is achieved in packs like the Osprey Talon, which has an “Airscape” system using ribs of foam under a mesh panel – this allows air to flow between the ribs and reduces areas of direct contact between your back and the bag’s main compartment.
The high-end solution is to have a suspended full-length mesh back panel that has a gap between it and the main compartment, as seen on the Osprey Stratos. This allows even greater airflow and significantly reduces contact pressure on your back. The downside is higher cost, greater weight, and slightly reduced capacity.
Water Resistance
Water resistance is an important consideration when choosing a daypack if you plan on hiking in anything other than bluebird weather. Daypacks are made water-resistant through the use of a DWR coating, which allows them to survive light rain and shower-like conditions. However, if they’re exposed to heavy rain for an extended period of time, then expect your bag to start leaking, particularly through the seams and zippers.
Several of the bags on our list, such as the REI Co-Op Trail, the Gregory Citro, and the Osprey Stratos, come with an integrated or stashed rain cover. The majority of packs don’t and you’ll need to purchase a pack cover separately.
Some of the best daypacks for hiking, such as the Hyperlite Daybreak, use Dyneema Composite Fabrics (DCF), which are as close as can be to being completely waterproof. However, be prepared to part with a significant wad of cash if you want to own one!
Weight
Weight is one of the most critical factors when choosing most outdoor gear, and it’s no different with daypacks.
However, while selecting a lighter option for day hikes is a good idea, we recommend evaluating your choice primarily on capacity and overall comfort – it’s rarely worth compromising on these metrics to save a few ounces.
Heavier packs often include more features such as better shoulder straps, hip straps, and back padding/suspension systems in order to better distribute the weight. Ultralight day packs typically have less support but are cheaper and more compressible.
The lightest pack we tested was the Sea to Summit Ultra-Sil Nano, which weighs just 1 oz. The next lightest is the REI Co-Op Flash 22, which weighs 13 oz. The heaviest packs were the Osprey Stratos 24 (2 lbs. 12 oz.) and REI Co-Op Traverse 32 (2 lbs. 9 oz.), both of which have integrated rain covers and significantly more padding in the shoulder straps and back panel.
Hydration Compatibility
Hydration compatibility is only an important consideration when choosing a daypack if you like to hydrate on the go.
Hydration compatibility simply means that the daypack has some way of storing a hydration bladder, either through an internal or external hydration sleeve next to the back panel. Most daypacks designed for hiking will have a hydration reservoir sleeve.
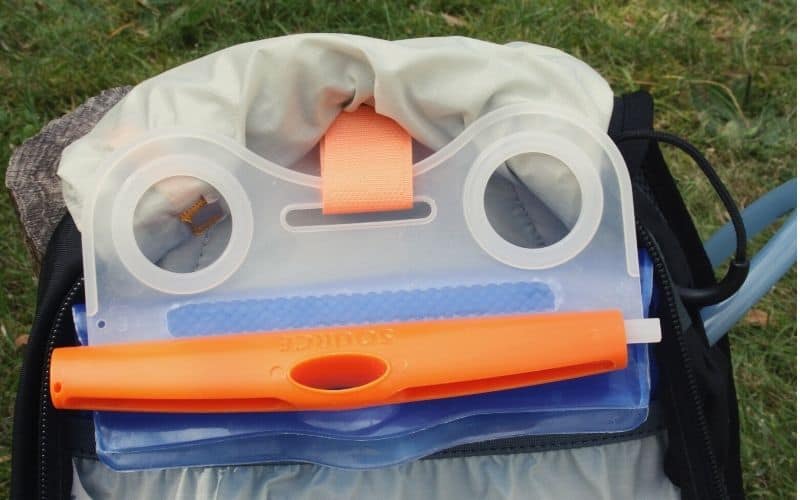
The reservoir slides into this sleeve and the hose is slipped through an opening either in the top or side of the bag. Many packs have a clip near the top of the bag to attach the reservoir so that they don’t slump down to the bottom of the sleeve under their own weight.
Make sure to choose a reservoir best suited to the size of your backpack i.e. 2L will work better with smaller packs like the Flash 18 whereas you can accommodate a 3L bladder in a larger hydration pack like the Osprey Stratos.
Some packs like the Gregory Citro come with a hydration bladder, saving you a little bit of money and hassle from having to purchase the two separately.
The Best Daypacks: The Verdict
Our testers unanimously the Osprey Talon 22 (Tempest 20) the best hiking daypack in the business after a month of testing in the High Sierra, the Julian Alps of Slovenia, and the English Lake District. This pack scores highly in every metric and lowly in none, making it the most well-rounded option available.
If you’re looking for a cheaper daypack, our list of tested packs has a few options – Deuter Speed Lite, the REI Co-Op Flash, and the REI Co-Op Trail. All three cut few corners to keep the cost down and are well worth considering whether you’re looking for a bargain buy or not.
If you liked this post or have any questions, drop us a line in the box below. And if you’d like to share it with your friends, please do!