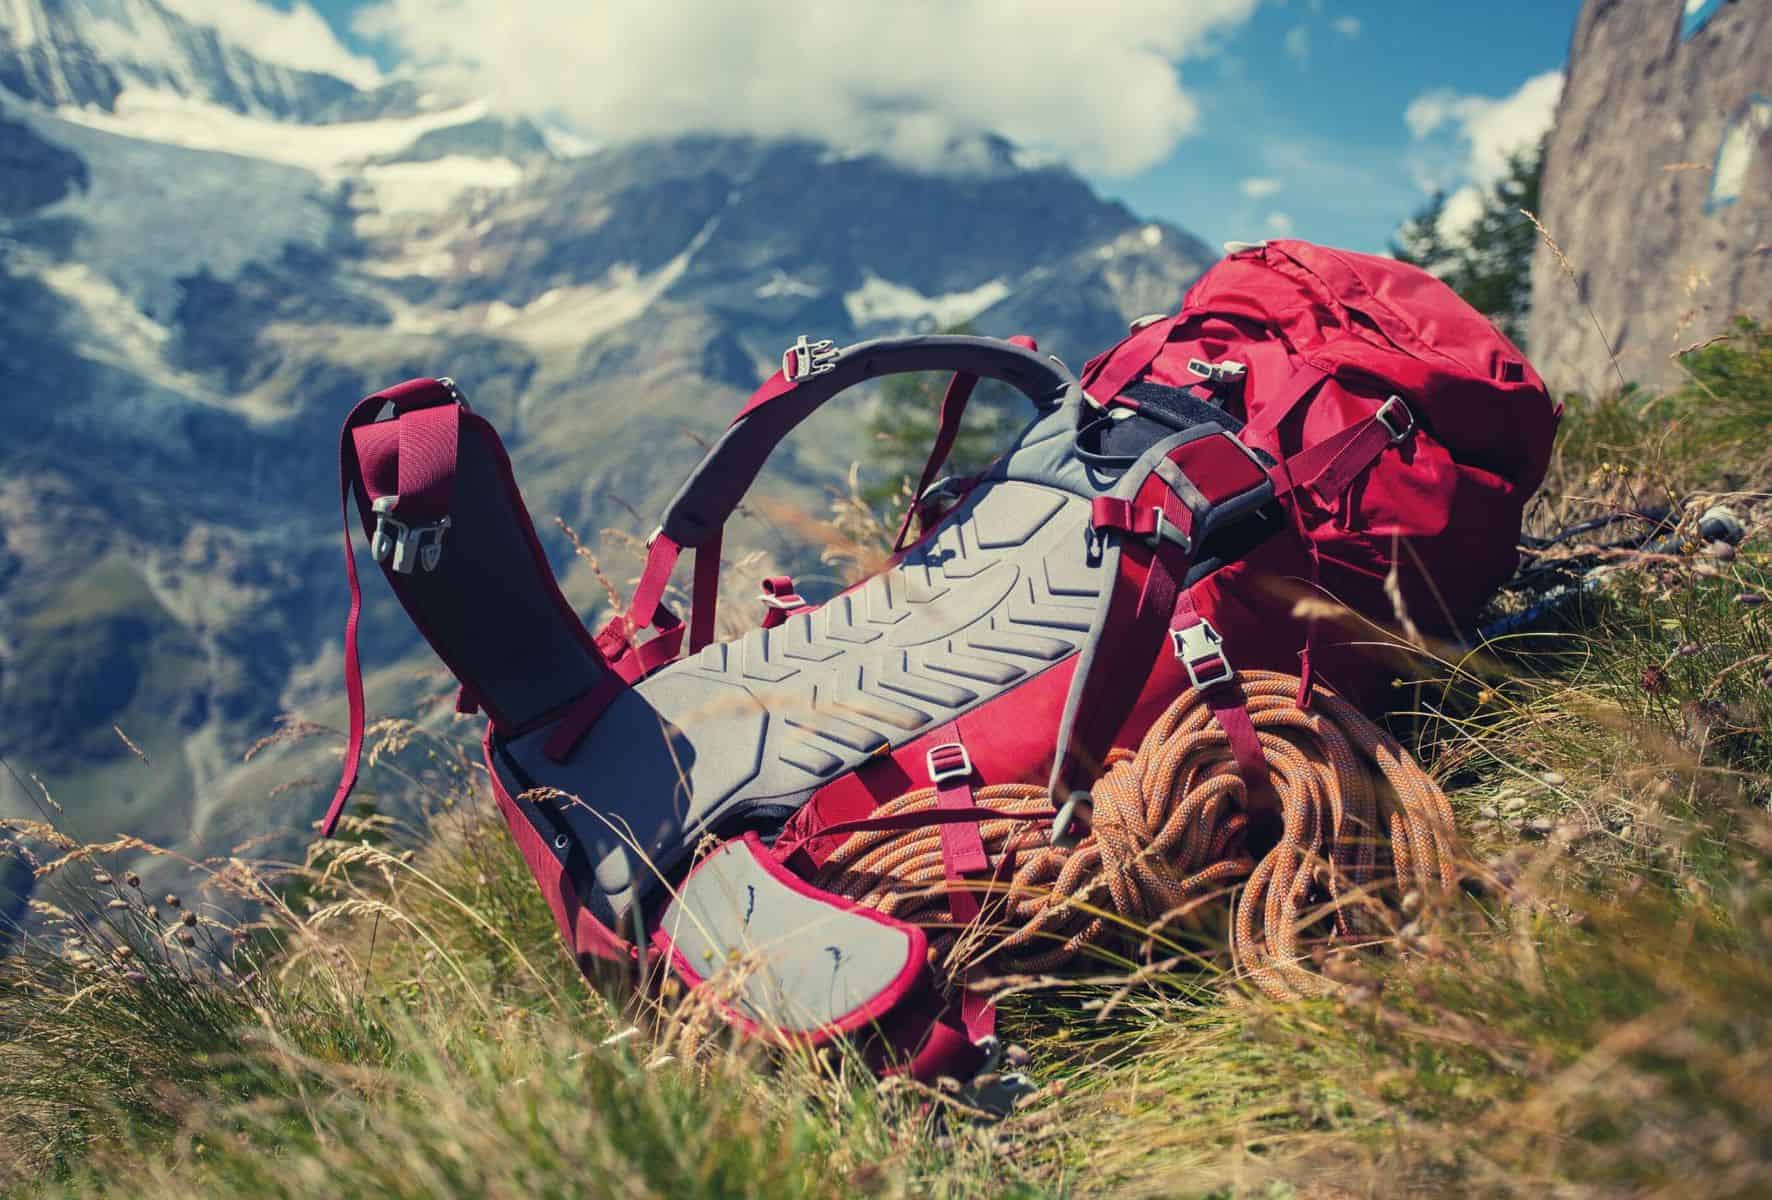
How you pack your backpack will impact your safety, comfort, and overall experience during outdoor adventures. Packing improperly can lead to wasted time searching for items, the risk of losing gear when digging deep into your pack, and unnecessary strain from carrying weight in sub-optimal positions.
In our guide, discover the significance of factors like accessibility, balance, and compression when packing a backpack for hiking, camping, or backpacking. Learn the optimal ways to store your tent, whether externally or within your pack. Understand the importance of choosing an appropriate pack size and make an informed decision between internal and external framed packs.
We’ll also walk you through the safe way to put on your backpack when you’re ready to hit the trail!
Do
Don’t

Table of Contents
- Packing a Backpack: Key Takeaways
- How To Pack A Hiking Backpack?
- INFOGRAPHIC: How To Pack A Backpacking Bag?
- How to Attach a Tent to a Backpack?
- How to Pack a Tent in a Backpack?
- How Does Backpack Capacity Affect Packability?
- What Size Backpack Do You Need?
- Should You Choose An Internal Or External Framed Backpack?
- How To Hoist A Loaded Backpack?
- How To Pack A Backpacking Pack Like A Pro
Save for later!!! ⤵️
How To Pack A Hiking Backpack?
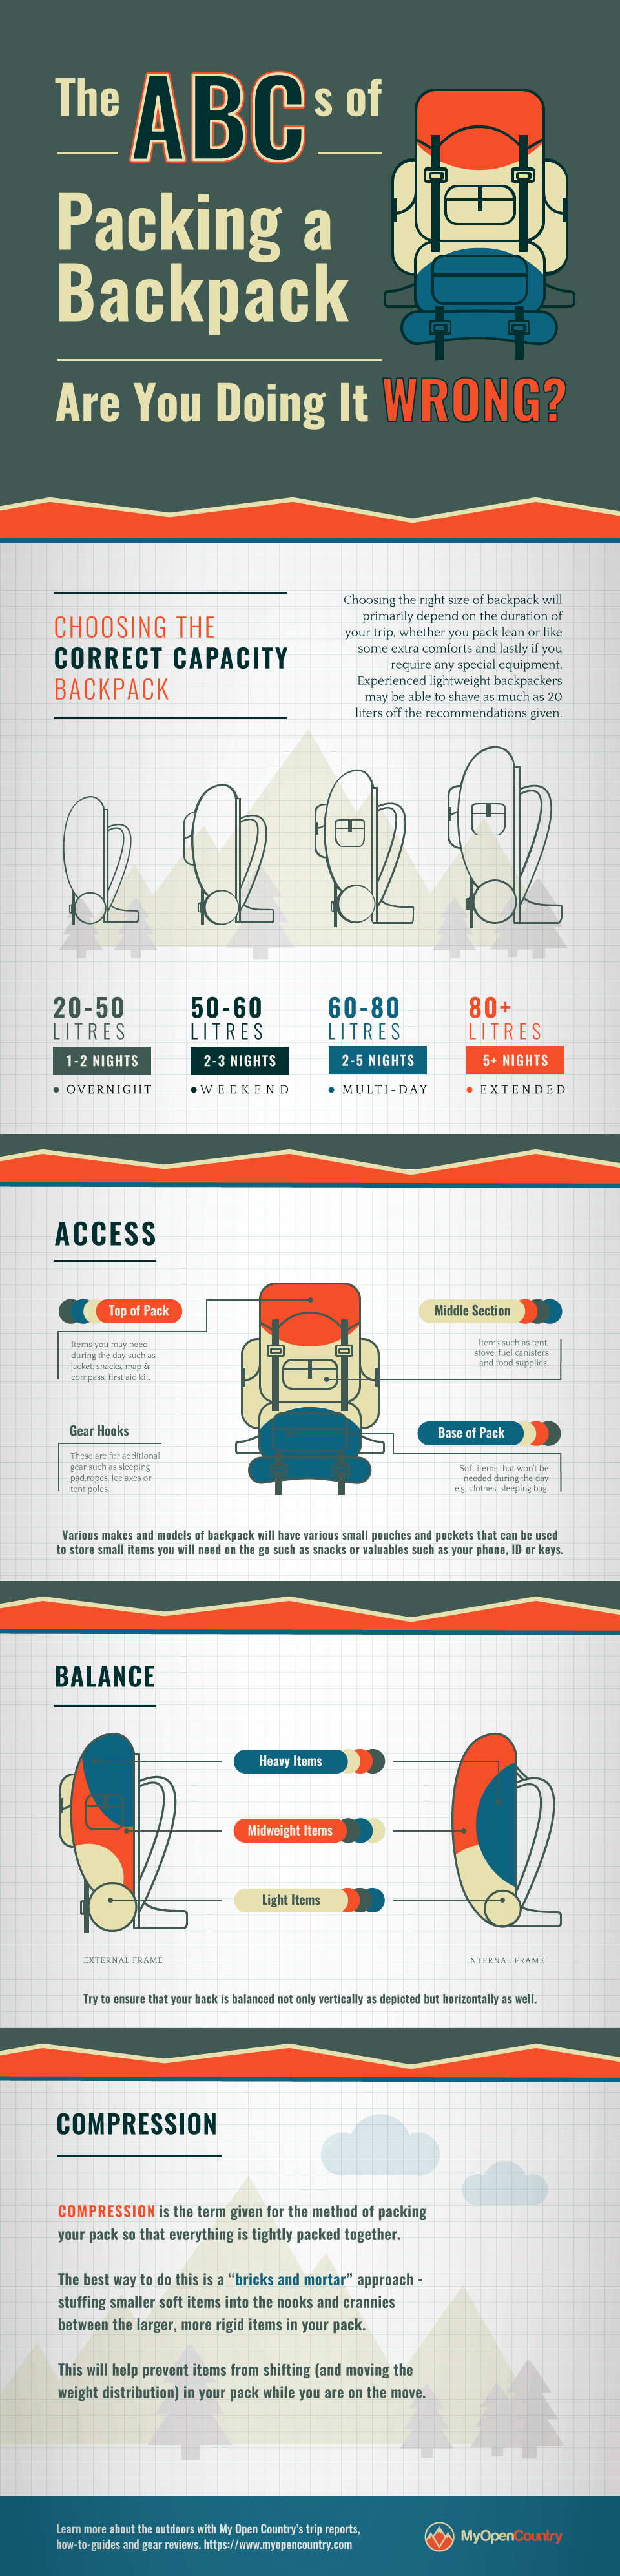
Organizing and packing your hiking backpack is key to balancing weight, maximizing comfort, and bringing all the necessary equipment for a safe and enjoyable hike. The ABCs of how to organize a hiking backpack aren’t complicated, you’ll find most are common sense, as listed below.
- Access
- Balance
- Compression
Access
Access means packing your backpack so you can easily locate gear when it’s needed with minimal fuss. There’s a tried-and-true method for access, as broken down in the list below.
- Bottom
- Middle
- Top
- External storage

1. Bottom
Grab all the squishy items you won’t need until you’ve stopped for the day and use them to create a soft foundation at the bottom of your pack. Sleeping bags, sleeping pads, pajamas, and any extra shoes should all make their way down to the base of your bag. Packing clothes efficiently is just as important as creating a soft foundation at the bottom of your pack. Roll clothing items tightly to maximize space and use compression sacks or packing cubes to keep everything organized. Make sure to distribute weight evenly throughout your pack to avoid putting strain on your back.
Not only does it prevent you from digging through your bag to find what you need mid-hike, but it also prevents you from falling on something hard if you take a tumble.
2. Middle
With a soft foundation, fill the middle of the backpack cavity with heavy gear you won’t need access to until later in the day. Items such as food, food storage, and cooking supplies can be packed on top of your soft sleeping items.
Since you don’t need your stove until the evening – it can be used as the foundation with soft items stuffed around it? Placing heavy items too high throws off your center of gravity, which is uncomfortable at best and dangerous during more technical or challenging climbs.
It’s also a good idea to add padding for the heavy or hard items. Extra clothing or your tent footprint are both good options.
3. Top
Items you’ll need easy access to throughout the day, like a warm sweater or rain jacket, should be packed at the top of your pack. Ensure easy access to your backpacking first aid kit is a must, and you’ll want to avoid having to dig for your water filter or toileting supplies.
Now, you’ll notice that these tips cover only the main cavity of your bag – not the many other pockets scattered across your bag. This is because these pockets vary so greatly between models and much of it comes down to personal preference.
However, what we can say is this: put anything you’ll need more than twice a day in these pockets.
Snacks, knives, compass, GPS, maps, lip balm, and other small items you’ll take out every hour should all be stowed in these pockets.
4. External Storage
The outside of your pack provides additional storage points. Extra gear can be carried using the gear and tool loops or daisy chains on the exterior or on the shoulder straps, sternum straps, and hip belt.
Gear like climbing ropes, camp stools, trekking poles, and tent poles are all carried this way. Carrying them on the outside saves internal space and also allows you to keep them close at hand.
Other items you might want to stow externally include a bear canister, rain cover, water bottle, first aid kit, and any other camp items that won’t fit in the central well or side pockets.
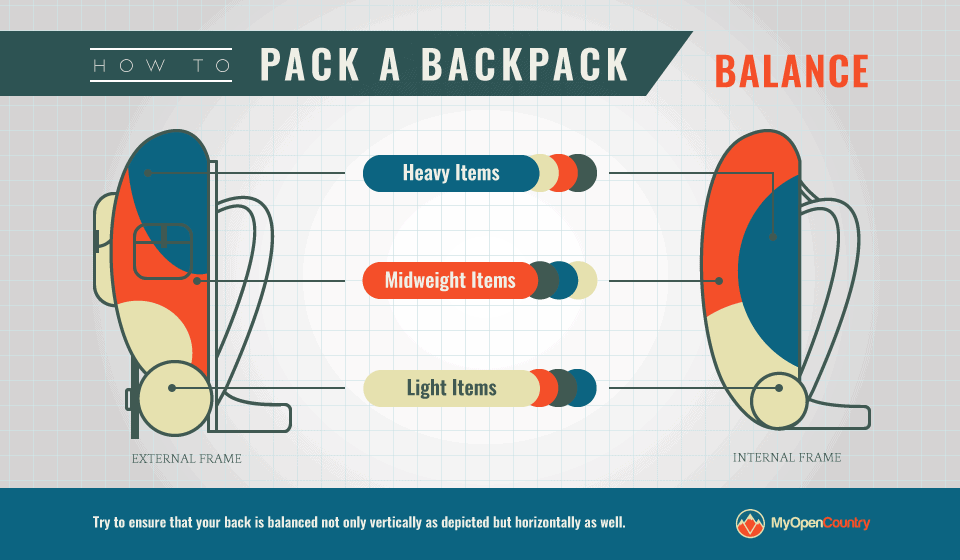
Balance
Packing for balance, as well as access, maximizes the efficiency with which you can carry your pack. If you’ve followed the Access instructions, your softest kit will be at the bottom (in the sleeping bag compartment), with bulkier items in the middle and smaller items on top. This is a good start for weight distribution, but there are a few more rules to follow.
Put the heaviest items next to the back panel and keep them centered to create a stable center of gravity. Keeping them there will prevent you from tipping over backward and improve your balance. Lighter gear (but not light gear like lightweight sleeping bags) should be kept on the outside and ideally toward the top.
The average recommendation for the overall carry weight is no greater than 1/3 of your body weight. However, 1/3 of your body weight is not an invitation; you might find 1/6th of your body weight is better suited for a good time on the trail.
However, it’s also worth noting that the best technique in the world will always be weighed down by old, heavy, or bulky equipment. In other words, camping in your grandfather’s old Boy Scout tent sounds cool, but it’s probably too heavy and bulky to make the experience worthwhile.
Compression
Now you know where to store gear in your pack, it’s time to make the most of that space by compressing items to stabilize and consolidate your load. The easiest way to do this is by using stuff sacks to keep specific gear items together.
This creates manageable ‘bricks’ with which to build up from the bottom of your rucksack. Ideally, each stuff sack should be a different color to ease identification. If you do color-code your kit, be sure to use light and bright colors that you can easily see when you look inside.
Once you’ve got your “bricks” (your stuff sacks) in there, you can consolidate further by stuffing a few loose items into the gaps between each one.
Once everything is in, use the compression straps to make sure everything is as close to your back as possible. This will consolidate and centralize your load and also prevent it from shifting as you walk.
INFOGRAPHIC: How To Pack A Backpacking Bag?
Our “ABCs of How to Pack a Hiking Backpack” infographic below summarizes all the key points we have discussed.
Want to use this infographic on your blog or website? Just copy and paste the code below!
How to Attach a Tent to a Backpack?
Most packs have two gear loops at the base designed for carrying ice axes; however, these loops can normally be extended to accommodate a tent and then cinched down securely. If your rucksack doesn’t have these loops, you can easily create your own by girth-hitching a sling or two to the webbing straps on the back of your backpack.
How to Pack a Tent in a Backpack?
If you pack your tent inside your backpack, make sure to store tent poles vertically to reduce the risk of poking a hole in your gear. Store pegs in a side pocket and use a thick storage pouch to prevent points from causing any damage. Some campers prefer to pack their tent this way as it stabilizes the load and minimizes the risk of damaging the tent from snaring on branches.
If your rucksack has a water reservoir but you prefer using water bottles, you also might be able to fold your tent and squeeze it in the reservoir for added protection.
How Does Backpack Capacity Affect Packability?
The ability to pack your backpack effectively largely depends on selecting a model with the right capacity. Remember, capacity isn’t only the size of the main compartment but also includes all the small areas and accessory pockets that contribute to the pack’s total volume.
Your goal is to find a way to ensure you have enough space to bring the essential equipment and enjoy the comfort of larger backpacks while also avoiding being weighed down with unnecessary weight.
If you’re an avid hiker or enjoy hiking and camping, it may even be worthwhile to own multiple backpacks: a lightweight rucksack for shorter, day hikes and a larger, comfort-oriented backpack for longer trips.
What Size Backpack Do You Need?
The size of backpack you choose will primarily be determined by the length of your trip, with hiking conditions and personal preference also being important factors.
A daypack may range from 20 to 35 liters depending on the make and model, with 20-liter bags suitable for carrying extra items as well as a packed lunch. You’ll need something larger to carry extra water and the full list of safety equipment required for more strenuous walks.
Additionally, you’ll need a larger backpack (35-liter) if you’re walking in the winter. Cold-climate clothing tends to be bulkier, and a larger backpack helps you carry bulky items like snowshoes.
Your daypack simply won’t be suitable for weekend trips because while it might hold your clothes, your camping gear won’t by any stretch fit inside a daypack. Weekend trips require 40 to 50-liter backpacks. If you’re taking a long weekend, a 50 to 70-liter backpack will do unless you’re a survivalist or a light packer.
Week-long trips will require an 80 to 100-liter backpack to carry all your gear and your food.
Traditional Guidelines: Pack Size Based on Trip Length
The table below outlines traditional guidelines for choosing a pack based on trip length. These are recommended for beginner hikers, those with lots of equipment, or parents with kids.
| Length of Trip | Pack Volume (Liters) |
|---|---|
| Single Day/Overnight (1-2 nights) | 20 – 50 |
| Weekend (2-3 nights) | 50 – 60 |
| Multi-day (2-5 nights) | 60 – 80 |
| Extended (5+ nights) | 80+ |
Streamlined Guidelines: Pack Size Based on Trip Length
The table below outlines streamlined guidelines for choosing a pack based on trip length. These are recommended for more experienced backpackers who have learned to economize.
| Length of Trip | Pack Volume (Liters) |
|---|---|
| Single Day/Overnight (1-2 nights) | 20 – 30 |
| Weekend (2-3 nights) | 30 – 50 |
| Multi-day (2-5 nights) | 45 – 55 |
| Extended (5+ nights) | 55+ |
Should You Choose An Internal Or External Framed Backpack?
When buying a new backpack, you’ll have to choose between an internal and external frame model. Frames provide structure to your pack, supporting and preventing the contents from shifting around, making it easier to carry. Without a frame, you’re effectively carrying a sack. Internal frames, now the standard for most manufacturers, are inside the fabric, while external frames are outside the fabric.
However, carrying an internal frame rucksack requires a different sort of packing in which you place heavy items in the space between your shoulder blades to help the bag sit on your hips and stabilize your body.
External frames are found in older models. The difference in carrying an external frame means placing heavy gear on top and in the center. An external frame uses the weight to keep you upright and encourage the weight to sit over your hips.
How To Hoist A Loaded Backpack?
Now you’ve mastered the ABCs of packing a backpack, you only need to safely hoist it onto your back! With your rucksack on the ground, you’ll be using your whole body to pick it up directly from the floor rather than wrestling it up using your arms and back. In preparation for picking it up, loosen the main straps on the pack so that it’s easy for you to slip into the shoulder harness.
With the pack upright on the ground, stand with your back to the back panel of the bag. Take a wider-than-neutral stance with bent knees for extra support. With a firm grip on the haul loop (at the top of the bag), slide the bag from the floor to thigh height and rest for a moment, maintaining your grip on the loop.
From your thigh, slip the arm not holding the loop through the shoulder strap until your shoulder is balancing the shoulder strap. With one shoulder in the shoulder strap, hinge slightly at the waist and use the momentum from your body to swing the pack across your back to put your other arm through the shoulder loop. Once the pack is comfortable on your back, adjust your straps.
It’s tempting to grab the handle (the haul loop) closest to you and then wrestle 1/3rd of your body weight onto your back. Do not do it. Not only will it wear out the handles and your shoulder straps, but you’ll struggle to remain in control of your load, especially if you haven’t followed the packing ABCs.
Safely moving a loaded pack onto your back requires following the steps above. Disregarding them wears out your (expensive) hiking equipment faster and increases the risk of causing injury to your back, shoulders, hips, or arms.
If you have adjusted your straps perfectly and don’t want to mess up the calibration? Forget about it. Don’t try to wiggle into a perfectly adjusted set of straps. Wait to adjust until your fully loaded rucksack is on your back – you won’t know your final adjustments until the pack is firmly on your back anyway.
How To Pack A Backpacking Pack Like A Pro
Now that you know how to pack your backpack like a pro, you’re well on your way to making your future camping, hiking, and backpacking trips safer, more comfortable, and far more convenient.
If you have any questions about this topic, please pop them in the comments box below! And if you’d like to share this post with your friends, please do!
Save for later!!! ⤵️

