If you are hiking or backpacking without a GPS device, knowing how to triangulate a position with a map and compass is the most reliable and accurate method to use. It’s a simple technique that can be learned in minutes and allows you to narrow down your location to a radius as small as ten meters.
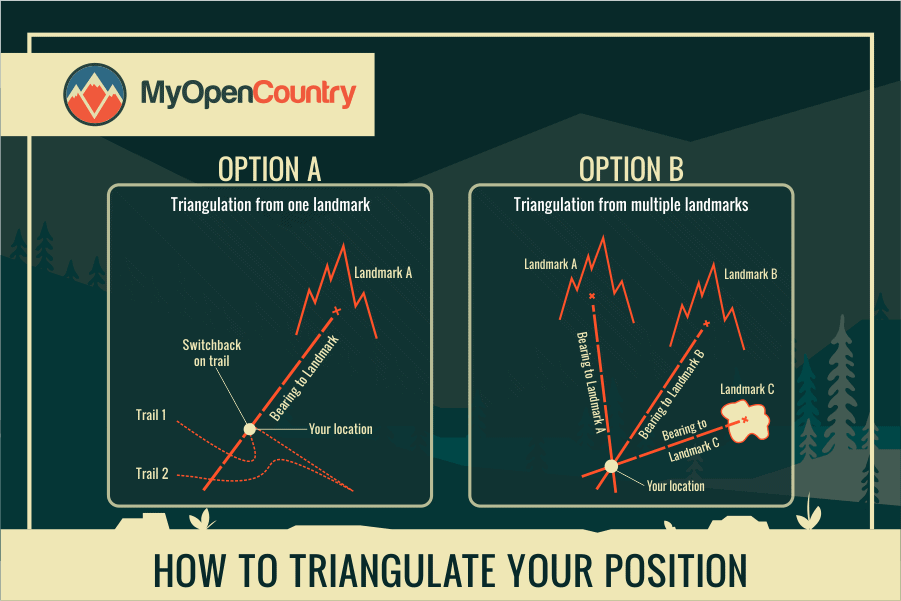
Triangulation relies on using two or three landmarks in the terrain to pinpoint your location. These natural or man-made elements form the corners of a geometric triangle. By precisely calculating the direction or bearing of each feature concerning your current position, you can accurately position yourself within that triangle.
Below, we present a straightforward, step-by-step guide to show you how to triangulate your position on a map with ease. You’ll only need to identify three nearby features, prepare your compass and map, and then take bearings to each of these features. We also outline how to triangulate using a prolonged landmark and only one other feature.
Do
Don’t

Table of Contents
How To Triangulate a Location? Three Easy Steps
To triangulate your position, you need a map of the area, a compass, and the following three instructions.
- Find 2 or 3 features in your surroundings
- Orientate your map and compass correctly
- Take bearings to find the intersection point
1. Identify Two Or Three Landmarks In The Distance
To triangulate successfully, you’ll need to identify 2 or 3 features or landmarks in the surrounding terrain and locate them on your map. This technique is challenging in low visibility, but in all but a complete whiteout, you should be able to identify at least a few usable landmarks or features in the surrounding terrain.
Some more prominent or obvious features you could use include buildings, peaks, knolls, hillocks, boulders, saddles, gullies, bluffs, lakes, ponds, and outcrops. Subtler features include steep points on a slope (marked by tightly packed contour lines on your map), turns or bends in a trail, river, or road, ridgelines, and/or trees and vegetation.
2. Prepare Your Map and Compass
Before taking bearings to any landmarks or features, you’ll need to correct for magnetic declination using your map and compass.
First of all, adjust your compass correctly for the area’s magnetic declination using the declination adjustment screw or dial. If the declination is east, subtract the declination value from the compass reading, if the declination is west, add the declination value to the compass reading.
Secondly, orient your map so it is facing true north, rather than magnetic north. This is done by aligning the orienting lines on your map with the north (red) needle in your compass.
3. Take Bearings To Each Feature
To take bearings from a landmark, hold your compass flat, pointing the direction of travel arrow at the landmark. Turn the compass dial until the magnetic needle’s red end aligns with the orienting arrow’s column on the bevel or needle housing. In hiking lingo, this is often called “putting red in the shed.”
Hence, we highly recommend buying a compass with a foldable mirror that allows you to take a bearing with your arm almost at full stretch.
Next, place your compass on the map so that the orienting lines are parallel to the map’s north-south or latitudinal meridian lines, and then move your compass, keeping the orienting lines aligned to the meridians, so the top corner of the base plate is positioned over or on the landmark.
Now, take out your pencil and carefully draw a line along the edge of your compass from the feature. Then take a bearing on another location in the distance, draw a line on your map, and finally repeat the process with a third landmark. Once you have done so, your position will be identified by the point on your map where the three drawn lines intersect.
If you’re in a pinch or a hurry, triangulation can also be done with only two features or landmarks, but for the most accurate results, we’d always recommend using three bearings.
How to Triangulate Position With A Single Landmark?
If you’re on a distinct and extended landmark, such as a path, road, river, or ridge, you can triangulate your position using only one other feature in the surrounding terrain.
In this case, simply repeat steps one through three above, this time using the single landmark. The point where the line taken from the bearing of this landmark passes through the feature you are standing on will give you your location.
In this case, simply repeat steps one through three above, this time using the single landmark. Draw a line of the bearing taken from this landmark and where this line crosses through the landmark you are standing on will give you your location.

Confident In Your Compass Triangulation Skills?
Knowing how to triangulate your position with a paper map and compass is an essential skill for outdoor exploration. In a nutshell, identify features in the terrain, locate them on your map, orient your map and compass correctly, then take precise bearings to each feature. Draw lines on your map to find the intersecting point, and you have successfully triangulated your position!
Additionally, for those situated on an extended landmark, like a river or ridge, you can triangulate with just one additional landmark nearby. Remember, the further you can extend your compass from your body, the more accurate your bearings will be.
If you liked the article, let us know in the comments below! We would love to find out if you learned anything or have any stories of your own where triangulation positioning got you out of a pickle!
